The Ultimate Guide to Condenser Microphones: Everything You Need to Know
Introduction: What Are Condenser Microphones and Why Should You Care?
Condenser microphones have become a go-to choice for various audio recording needs. Whether you’re recording a podcast, laying down vocals in a studio, or capturing sound for a live stream, these microphones are often praised for their clarity, precision, and versatility. In this guide, we’ll explore the essential details of condenser microphones—from how they work and the different types available, to how you can choose the best one for your specific needs. By the end, you’ll have a clearer understanding of why these microphones are so popular and how to make the most of them.
Section 1: The Basics of Condenser Microphones
What Is a Condenser Microphone?
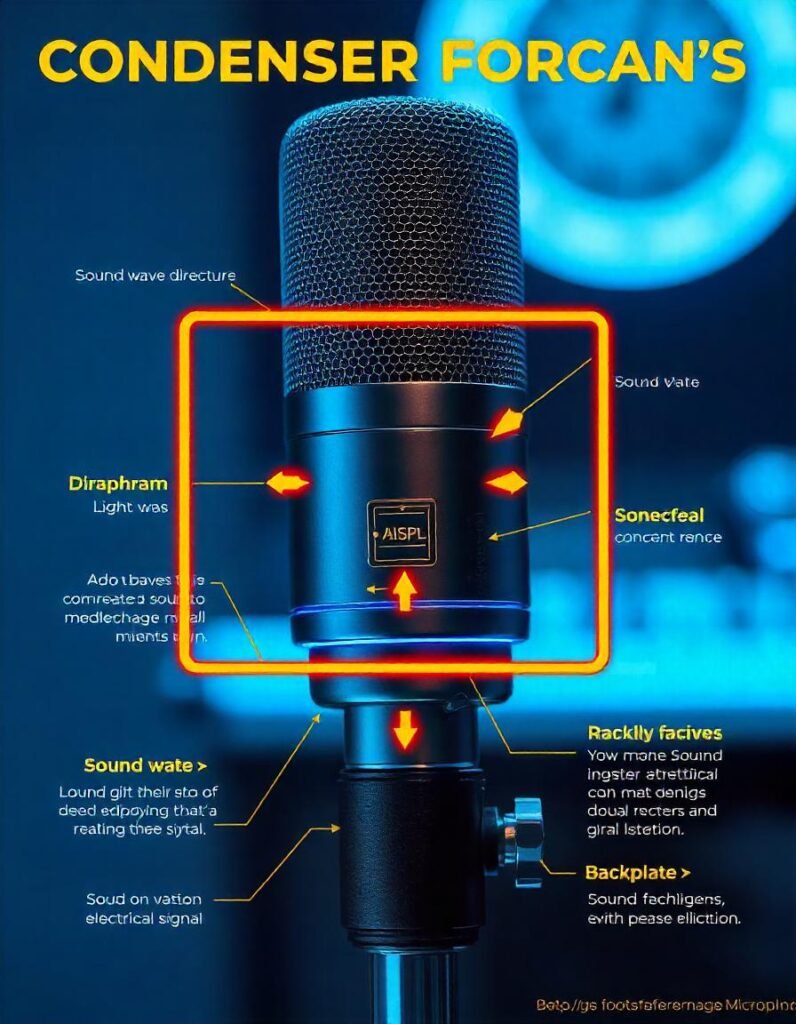
A condenser microphone is a type of microphone that uses a diaphragm and a backplate to capture sound. Unlike dynamic microphones that rely on an electromagnetic mechanism, condenser microphones use a capacitor (condenser) to convert sound vibrations into an electrical signal. This results in a highly sensitive microphone capable of picking up even the faintest sounds, making them ideal for recording detailed vocals and instruments.
One of the key differences between condenser and dynamic microphones is their sensitivity. Condenser microphones capture more nuanced details, which makes them an excellent choice for studio environments where sound quality is paramount.

How Do Condenser Microphones Work?
At the heart of a condenser microphone’s operation is the diaphragm, a thin, flexible membrane that vibrates when sound waves hit it. The diaphragm is positioned very close to a backplate, and the space between the diaphragm and the backplate forms a capacitor. As sound causes the diaphragm to move, the distance between the diaphragm and the backplate changes, altering the capacitance and generating an electrical signal that can be amplified and recorded.
This process allows condenser microphones to capture a broad range of frequencies with high accuracy. However, because of their sensitivity, they also pick up unwanted background noise more easily than dynamic microphones.
Section 2: Types of Condenser Microphones
Small-Diaphragm vs. Large-Diaphragm Microphones
Condenser microphones come in two main diaphragm sizes: small and large.
Small-Diaphragm Microphones: These microphones typically offer a more accurate and natural sound, making them excellent for recording instruments, especially in situations where precision is important, such as in orchestral or acoustic music recording. Their smaller diaphragms allow them to respond quickly to fast transients and higher frequencies.
Large-Diaphragm Microphones: On the other hand, large-diaphragm microphones are often favored for vocal recordings. Their larger diaphragm tends to provide a fuller, warmer sound with more emphasis on lower frequencies, which makes them ideal for capturing human voices with a rich and smooth tonal quality.
Cardioid, Omnidirectional, and Other Polar Patterns
The polar pattern of a microphone determines the direction from which it picks up sound. Condenser microphones often come with several polar pattern options:
- Cardioid: This is the most common polar pattern. It picks up sound from the front of the microphone and rejects sound from the sides and rear. Cardioid microphones are great for situations where you want to focus on a single sound source, like recording vocals or podcasts.
- Omnidirectional: These microphones capture sound from all directions. They’re perfect for recording an entire room, a choir, or any situation where you want to capture ambient sound.
- Bidirectional (Figure-8): These microphones pick up sound from the front and back while rejecting sound from the sides. They’re useful for interviews or recording two sound sources facing each other.
Powered vs. Phantom-Powered Condenser Microphones
Condenser microphones typically require power to operate, which can either come from an internal battery or, more commonly, phantom power provided by an audio interface. Phantom power is a 48V power supply that travels through the XLR cable to the microphone. This means you can connect your microphone to most audio interfaces or mixers without worrying about additional power sources.
Section 3: Choosing the Right Condenser Microphone
Factors to Consider When Selecting a Condenser Microphone
Choosing the right condenser microphone can be overwhelming with so many options on the market. Here are the main factors to consider:
- Budget: Microphones range from affordable entry-level options to high-end professional gear. You don’t need to spend a fortune to get a quality mic, but you should invest according to your needs and the importance of sound quality for your work.
- Intended Use: Are you recording vocals, instruments, podcasts, or voice-overs? Different microphones are better suited to different applications.
- Frequency Response and Sensitivity: Look for a microphone with a wide frequency response range for detailed sound reproduction. A low self-noise is also essential if you plan on recording quiet sound sources.
- Polar Pattern: Choose the right pattern based on your recording environment and what you want to capture.
Best Condenser Microphones for Different Use Cases
| Use Case | Microphone Model | Price Range | Best For |
|---|---|---|---|
| Podcasting | Audio-Technica AT2020 | $100 – $150 | Clear voice capture, budget-friendly |
| Studio Vocals | Shure SM7B | $400 – $450 | Professional vocal recording |
| Acoustic Instruments | Neumann TLM 103 | $1,000+ | High-end studio quality recording |
| Budget-Friendly | Samson C01U Pro | $70 – $90 | Affordable, great for beginners |
Section 4: Setting Up and Using Your Condenser Microphone
How to Set Up Your Condenser Microphone
Setting up your condenser microphone is crucial for getting the best sound. Here are the steps to follow:
- Connect Your Microphone: Plug the microphone into an audio interface using an XLR cable. Ensure that phantom power is enabled if your mic requires it.
- Position the Microphone: Place the microphone on a sturdy stand and adjust the angle so it’s directed towards your sound source. For vocals, a typical distance of 6-12 inches works well.
- Use Accessories: Pop filters and shock mounts are essential to reduce plosives (popping sounds from “p” and “b” sounds) and vibrations from the stand.
Tips for Achieving the Best Sound Quality
- Control Your Room Acoustics: To avoid unwanted reflections or echo, try to record in a quiet, treated space with soft furnishings or foam panels.
- Microphone Placement: Experiment with different mic placements. For vocals, aiming slightly off-axis can reduce sibilance and harshness.
- Avoid Handling Noise: Use a shock mount to prevent vibrations from your stand or movements from reaching the mic.
Common Issues and Troubleshooting
- Low Output: Check that phantom power is enabled, and ensure your audio interface gain is set correctly.
- Distortion or Clipping: Make sure you’re not too close to the microphone. Lower the gain or use a pop filter.
- Hiss or Background Noise: This could be caused by poor-quality cables or interference. Try using balanced cables and positioning your microphone away from electronic devices.
Section 5: Care and Maintenance of Condenser Microphones.
Why Proper Maintenance Matters
To keep your condenser microphone in top shape, regular maintenance is necessary. These microphones are delicate and sensitive, so neglecting care can lead to poor performance or even damage.
Cleaning and Storing Your Condenser Microphone
- Cleaning the Mic: Gently wipe down the microphone with a microfiber cloth to remove dust. Use compressed air to clean the grille.
- Proper Storage: Always store the mic in a case when not in use to protect it from dust, moisture, and physical damage.
Common Mistakes to Avoid
- Exposure to Moisture: Avoid using your microphone in humid conditions or near liquids, as moisture can damage internal components.
- Dropping the Mic: Be cautious when handling. If you drop it, check for any signs of damage or issues with sound quality.
Section 6: Advanced Techniques and Tips for Professional Use
Using Multiple Condenser Microphones for Recording
When recording multiple instruments or capturing a live environment, using several microphones can create a more immersive sound. Techniques like the XY, AB, or ORTF method allow you to capture sound in stereo or surround formats. These techniques require precise mic placement to avoid phase cancellation.
Understanding Polar Pattern Switching
Some high-end condenser microphones allow you to switch between polar patterns. This feature is incredibly useful in a variety of recording situations. For example, you may prefer a cardioid pattern for solo vocals but switch to omnidirectional when recording an ensemble of instruments.
Integrating Your Condenser Microphone into a Larger Setup
In professional setups, condenser microphones often integrate with an audio interface, a preamp, and possibly a mixer. Ensure that each piece of equipment is compatible with your microphone, and make adjustments in your Digital Audio Workstation (DAW) to get the best sound possible.
Final Thoughts: Making the Right Choice for Your Needs
Choosing the right condenser microphone involves balancing your recording environment, your sound preferences, and your budget. Whether you’re a beginner looking for an affordable mic or a seasoned professional seeking studio-grade equipment, understanding your needs and how condenser microphones work is key to making the best choice.
FAQ Section
Q1: Do I need an audio interface to use a condenser microphone?
Yes, most condenser microphones require phantom power, which is usually provided by an audio interface.
Q2: Can I use a condenser microphone for live performances?
While condenser mics are great for studio settings, they can be used for live performances if the environment is controlled, and the sound is properly managed.
Q3: Are expensive condenser microphones worth it?
Higher-end microphones generally provide better clarity, build quality, and durability. However, many affordable models can offer excellent sound for most applications.
Q4: What’s the difference between a condenser mic and a dynamic mic?
Condenser mics are more sensitive and capture more detail, while dynamic mics are more durable and less sensitive to ambient noise.
Q5: How do I know if my microphone needs maintenance?
Signs like decreased sound quality, distortion, or physical damage (cracks or dents) can indicate that your microphone needs maintenance.